Navigation menu
Help:Images: Difference between revisions
Metroidking (talk | contribs) |
m (Text replacement - "[[Metroid Wiki:Quality Standards" to "[[Metroid Wiki:Policy") |
||
| (3 intermediate revisions by 2 users not shown) | |||
| Line 1: | Line 1: | ||
{{Template:Help-nav}} | {{Template:Help-nav}} | ||
'''Images''' help detail | '''Images''' help detail article subjects and provide extra understanding of it. They're also more aesthetically pleasing than plain text. | ||
==Uploading Files== | ==Uploading Files== | ||
You can upload images by using the upload link (or by pressing alt-shift-u (FireFox)/alt-u (other browsers)), located in the toolbox of the sidebar. This will send you to [[Special:Upload]]. Use the form to select a file to upload, and adjust the filename appropriately. (See Metroid Wiki's [[Metroid Wiki:Policy#Images|Image Standards]] for naming conventions.) | |||
You can upload images by | |||
If you are uploading a new version of a preexisting file, you can find a button that says "Upload a new version of this file" between the file history and file links sections of a file page. This will upload the file to the name of the older version. Please note that any changes made may take some time to appear. | If you are uploading a new version of a preexisting file, you can find a button that says "Upload a new version of this file" between the file history and file links sections of a file page. This will upload the file to the name of the older version. Please note that any changes made may take some time to appear. | ||
=== | ===Licensing=== | ||
Licensing templates are used to denote an image's copyright status. Two templates exist for this purpose: | |||
* [[Template:Copyright]] is the primary licensing template that is used for any copyrighted images. It is added by placing <nowiki>{{copyright}}</nowiki> on a file page. ''This template is automatically included when using the [[Template:Source]] and need not be added in addition to it.'' | |||
* | |||
*[[Template:Fan Art]] is used on any fan made images. It is added by placing <nowiki>{{Fan Art}}</nowiki> on a file page. '''Note: Do ''not'' upload fan art without permission from its author.''' | |||
=== | ===Image Sourcing=== | ||
Image sourcing is an important way to give credit to the original source of the image. Two templates are used to source images on Metroid Wiki. All images taken from an external source '''must''' have one of these templates placed on it. | |||
*[[Template:Source]] is used to source images acquired from miscellaneous sites (Metroid Recon, Metroid Database, Nintendo.com etc). It is also used to source the individual who captured a screenshot, the program with which it was edited (if any), and the purpose of the editing. | |||
:Filling in the optional fields also automatically categorizes the image by such parameters as type and game, and should be used whenever possible. Visit [[Template:Source]] and [[Help:Screenshots]] for more information. | |||
*[[Template:WikimediaImage]] is used for images taken from a Wikimedia site. it is added to an article by placing <nowiki>{{WikimediaImage| url of original image}}</nowiki> | |||
[[Template: | |||
=== | ===Categorization=== | ||
[[file:Echo Visor mp2 Screenshot.jpg|right|thumb|200px|File:Echo Visor mp2 Screenshot.jpg]] | |||
[[ | Images should be categorized according to their subject matter. Images such as [[:File:Echo Visor mp2 Screenshot.jpg]] (shown at right) are categorized under [[:Category:Aether Wildlife|Aether Life Forms]] and [[:Category:Torvus Bog Wildlife|Torvus Bog Life Forms]] due to the inclusion of [[Shrieker]]s. Because the image also demonstrates the usage of the [[Echo Visor]], it is also categorized under [[:Category:Visors|Visors]]. | ||
Images should also categorized by game and image type. This is done automatically when using [[Template:Source]]. | |||
Images | {{clear}} | ||
Images are | ==Adding Images to Articles== | ||
Images are added to pages using wiki markup similar to that used to create a link. For example, <nowiki>[[File:Metroid Wiki Logo Small.png]]</nowiki> adds the image to the page. To create a regular page link to a file, add a colon to front of the filename, as demonstrated: <nowiki>[[:File:Metroid Wiki Logo Small.png]]</nowiki> becomes [[:File:Metroid Wiki Logo Small.png]]. | |||
Optional syntax can be used to adjust the image in various ways. | |||
{| style="width:100%; {{border}}" cellpadding="2" cellspacing="0" | |||
{| style="{{border | ! style="width:30%;" | Syntax | ||
! style="width:30%;" | Explanation | |||
! style="width:30%;" | Result | |||
|- | |- | ||
| style="text-align: center; {{border}} {{background}}" | <nowiki>[[File:Dark Quad MB.png|180px]]</nowiki> | |||
| style="text-align: center; {{border}} {{background}}" | An image file sized to 180 pixels.<br>An image file without this parameter will appear full size. | |||
| style="text-align: center; {{border}} {{background}}" | [[File:Dark Quad MB.png|180px]] | |||
|- | |- | ||
| style="text-align: center; {{border}} {{background}}" | | | style="text-align: center; {{border}} {{background}}" | <nowiki>[[File:Dark Quad MB.png|180px|link=Dark Quad]]</nowiki> | ||
| style="text-align: center; {{border}} {{background}}" | | | style="text-align: center; {{border}} {{background}}" | An image file, 180 pixels, that links to a page.<br>External URLs may also be used. | ||
| style="text-align: center; {{border}} {{background}}" | | | style="text-align: center; {{border}} {{background}}" | [[File:Dark Quad MB.png|180px|link=Dark Quad]] | ||
| | |||
|- | |- | ||
| style="text-align: center; {{border}} {{background}}" | <nowiki>[[File:Dark Quad MB.png|180px|left]]</nowiki> | |||
| style="text-align: center; {{border}} {{background}}" | An image file, 180 pixels, positioned left.<br>Center and right may also be used. | |||
| style="text-align: center; {{border}} {{background}}" | [[File:Dark Quad MB.png|180px|left]] | |||
|- | |- | ||
| style="{{border}} {{background}}" | | | style="text-align: center; {{border}} {{background}}" |<nowiki>[[File:Dark Quad MB.png|180px|border]]</nowiki> | ||
| style="{{border}} {{background}}" | | | style="text-align: center; {{border}} {{background}}" | An image file, 180 pixels, with a gray border.<br>Captions cannot be added using the Border parameter. | ||
| style="{{border}} {{background}}" | | | style="text-align: center; {{border}} {{background}}" | [[File:Dark Quad MB.png|180px|border]] | ||
| | |||
|- | |- | ||
| style="text-align: center; {{border}} {{background}}" | <nowiki>[[File:Dark Quad MB.png|frame|A Dark Quad MB]]</nowiki> | |||
| style="text-align: center; {{border}} {{background}}" | An image file, with a border and gray background.<br>The frame parameter always displays the image at full size. | |||
| style="text-align: center; {{border}} {{background}}" | [[File:Dark Quad MB.png|180px|frame|A Dark Quad MB]] | |||
| style="text-align: center; {{border}} {{background}}" | <nowiki>[[File: | |||
| style="text-align: center; {{border}} {{background}}" | | |||
| style="text-align: center; {{border}} {{background}}" | [[File: | |||
|- | |- | ||
| style="{{border}} {{background}}" | | | style="text-align: center; {{border}} {{background}}" | <nowiki>[[File:Dark Quad MB.png|thumb|A Dark Quad MB]]</nowiki><br><br><nowiki>[[File:Dark Quad MB.png|thumb|center|100px]]</nowiki> | ||
| style="{{border}} {{background}}" | | | style="text-align: center; {{border}} {{background}}" | An image file, converted into a {{wp|thumbnail}}. <br>Thumbs default to a width of 180px and a default right hand justification.<br><br>Size and alignment can be adjusted manually. Captions may be added or omitted. | ||
| style="{{border}} {{background}}" | | | style="text-align: center; {{border}} {{background}}" | [[File:Dark Quad MB.png|thumb|A Dark Quad MB]]<br><br>[[file:Dark Quad MB.png|thumb|center|100px]] | ||
|- | |- | ||
|} | |} | ||
[[Category:Help|{{PAGENAME}}]] | [[Category:Help|{{PAGENAME}}]] | ||
Latest revision as of 05:16, 30 July 2015
| |||
|---|---|---|---|
Images help detail article subjects and provide extra understanding of it. They're also more aesthetically pleasing than plain text.
Uploading Files
You can upload images by using the upload link (or by pressing alt-shift-u (FireFox)/alt-u (other browsers)), located in the toolbox of the sidebar. This will send you to Special:Upload. Use the form to select a file to upload, and adjust the filename appropriately. (See Metroid Wiki's Image Standards for naming conventions.)
If you are uploading a new version of a preexisting file, you can find a button that says "Upload a new version of this file" between the file history and file links sections of a file page. This will upload the file to the name of the older version. Please note that any changes made may take some time to appear.
Licensing
Licensing templates are used to denote an image's copyright status. Two templates exist for this purpose:
- Template:Copyright is the primary licensing template that is used for any copyrighted images. It is added by placing {{copyright}} on a file page. This template is automatically included when using the Template:Source and need not be added in addition to it.
- Template:Fan Art is used on any fan made images. It is added by placing {{Fan Art}} on a file page. Note: Do not upload fan art without permission from its author.
Image Sourcing
Image sourcing is an important way to give credit to the original source of the image. Two templates are used to source images on Metroid Wiki. All images taken from an external source must have one of these templates placed on it.
- Template:Source is used to source images acquired from miscellaneous sites (Metroid Recon, Metroid Database, Nintendo.com etc). It is also used to source the individual who captured a screenshot, the program with which it was edited (if any), and the purpose of the editing.
- Filling in the optional fields also automatically categorizes the image by such parameters as type and game, and should be used whenever possible. Visit Template:Source and Help:Screenshots for more information.
- Template:WikimediaImage is used for images taken from a Wikimedia site. it is added to an article by placing {{WikimediaImage| url of original image}}
Categorization
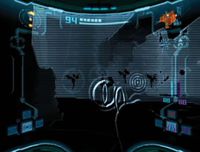
Images should be categorized according to their subject matter. Images such as File:Echo Visor mp2 Screenshot.jpg (shown at right) are categorized under Aether Life Forms and Torvus Bog Life Forms due to the inclusion of Shriekers. Because the image also demonstrates the usage of the Echo Visor, it is also categorized under Visors.
Images should also categorized by game and image type. This is done automatically when using Template:Source.
Adding Images to Articles
Images are added to pages using wiki markup similar to that used to create a link. For example, [[File:Metroid Wiki Logo Small.png]] adds the image to the page. To create a regular page link to a file, add a colon to front of the filename, as demonstrated: [[:File:Metroid Wiki Logo Small.png]] becomes File:Metroid Wiki Logo Small.png.
Optional syntax can be used to adjust the image in various ways.
| Syntax | Explanation | Result |
|---|---|---|
| [[File:Dark Quad MB.png|180px]] | An image file sized to 180 pixels. An image file without this parameter will appear full size. |

|
| [[File:Dark Quad MB.png|180px|link=Dark Quad]] | An image file, 180 pixels, that links to a page. External URLs may also be used. |

|
| [[File:Dark Quad MB.png|180px|left]] | An image file, 180 pixels, positioned left. Center and right may also be used. |
 |
| [[File:Dark Quad MB.png|180px|border]] | An image file, 180 pixels, with a gray border. Captions cannot be added using the Border parameter. |

|
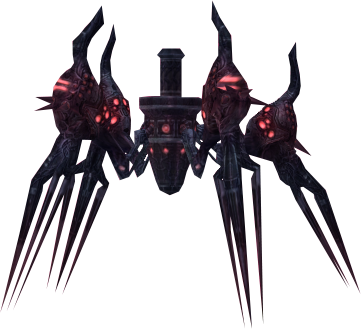
| [[File:Dark Quad MB.png|frame|A Dark Quad MB]] | An image file, with a border and gray background. The frame parameter always displays the image at full size. |
 |
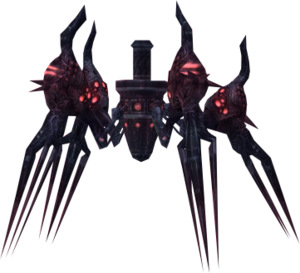
| [[File:Dark Quad MB.png|thumb|A Dark Quad MB]] [[File:Dark Quad MB.png|thumb|center|100px]] |
An image file, converted into a thumbnail. Thumbs default to a width of 180px and a default right hand justification. Size and alignment can be adjusted manually. Captions may be added or omitted. |
  |
