Navigation menu
Main Reactor: Difference between revisions
m (There's lore and scan data here I believe.) |
(Added more information and tidied up the page) |
||
| (3 intermediate revisions by 2 users not shown) | |||
| Line 1: | Line 1: | ||
{{Room-infobox | {{Room-infobox | ||
|image=[[File:Main | |image=[[File:Main Reactor.png|250px]] | ||
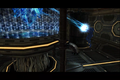
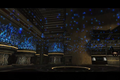
|caption= | |caption=[[Samus Aran|Samus]] entering the Main Reactor for the first time | ||
|game=''[[Metroid Prime 2: Echoes]]'' | |game=''[[Metroid Prime 2: Echoes]]'' | ||
|location=[[Agon Wastes]] | |location=[[Agon Wastes]] | ||
| Line 14: | Line 14: | ||
*[http://metroid.retropixel.net/mprime2/music/mp228.mp3 Space Pirates Ambiance] | *[http://metroid.retropixel.net/mprime2/music/mp228.mp3 Space Pirates Ambiance] | ||
}} | }} | ||
The '''Main Reactor''' is a room in the [[Agon Wastes]]. The room connects the [[Sand Processing]], [[Storage D]], [[Ventilation Area A]], by a [[White Hatch]], and [[Security Station B]], by a [[Purple Hatch]]. | |||
The '''Main Reactor''' is a room in the [[Agon Wastes]]. The room connects the [[Sand Processing]], [[Storage D]], [[Ventilation Area A]], by a [[White | |||
==Inhabitants== | ==Appearance and Navigation== | ||
The room consists of a central room, surrounded by an upper walkway. The center room is taken up by a large number of tanks that contain large amounts of [[Phazon]]. The largest of these tanks is located in the center of the room. There are a series of tanks on one side of the room that can be navigated through using [[Spider Ball Track]]s and the [[Boost Ball]]. Each tank has moving parts that will block the way, along with damaging Phazon on the bottom. If [[Samus Aran|Samus]] falls to the bottom, she can leave each tank using a small hole leading back to the main room. If Samus successfully navigates the tanks, she will acquire a [[Missile Expansion]] at the end. | |||
The upper walkway has two sections. The main section has doors to the Sand Processing, Storage D, and Security Station B. The latter door is separated by a gate that can be lowered by hitting a white crystal with the [[Dark Beam]]. There is an elevator connecting the levels near Storage D. There is also a large opening near the door to the Sand Processing, next to a dark purple area that is the destination of a [[Portal]] in the [[Dark Oasis]]. The Door to Ventilation Area A is located in a separate section, that can only be accessed from below using a Spider Ball Track. This section has the corpse and final testament of [[B-Stl]]. When Samus first enters the room, she sees [[Dark Samus]] absorbing energy from the central tank. Upon entering the central area, a battle between the two "Hunters" will start. When Dark Samus has been destroyed, the elevator will be activated. | |||
===Upgrades=== | |||
====[[Missile Expansion]]==== | |||
'''Requires: [[Spider Ball]] and [[Boost Ball]]''' | |||
*Once Samus has obtained the Spider Ball, she can enter a ledge above the Phazon containers in the northern part of the room. By using the Boost Ball, she can bounce between various platforms to reach the opposite side of the ledge, where the expansion can be found under a hatch in the ground that be destroyed using a [[Morph Ball Bomb]]. | |||
==Data== | |||
===Available Logbook Entries=== | |||
<gallery> | |||
File:Phazon mp2 Logbook.png|[[Metroid Prime 2: Echoes Logbook#Phazon|Phazon]] | |||
File:Dark Samus mp2 Logbook.png|[[Metroid Prime 2: Echoes Logbook#Dark Samus 1|Dark Samus]]* | |||
File:Luminoth_03.png|[[Metroid Prime 2: Echoes Logbook#B-Stl's Testament|B-Stl's Testament]] | |||
File:Spider Ball Track (Echoes).png|[[Metroid Prime 2: Echoes Logbook#Spider Ball Track|Spider Ball Track]] | |||
</gallery> | |||
<nowiki>*</nowiki><small>Denotes limited scan</small> | |||
===Scans=== | |||
{{scan | |||
|data=This is a powered [[Door|door]] system. Low-level energy shield on door to prevent activation by local creatures. Weapon fire of any type will disrupt the shield and open the door.<ref>{{cite|This is a powered [[Door|door]] system. Low-level energy shield on door to prevent activation by local creatures. Weapon fire of any type will disrupt the shield and open the door.|Scan Data|[[Metroid Prime 2: Echoes]]}}</ref> | |||
|game=mp2 | |||
|location=[[Agon Wastes]] – Main Reactor | |||
|description=[[Blue Door]] | |||
|order=top | |||
}} | |||
{{scan | |||
|data=There is a [[Blast Shield]] on the door blocking access. Analysis indicates that the Blast Shield is invulnerable to most weapons. [[Dark Beam|Dark energy]] may damage it.<ref>{{cite|There is a [[Blast Shield]] on the door blocking access. Analysis indicates that the Blast Shield is invulnerable to most weapons. [[Dark Beam|Dark energy]] may damage it.|Scan Data|[[Metroid Prime 2: Echoes]]}}</ref> | |||
|game=mp2 | |||
|location=[[Agon Wastes]] – Main Reactor | |||
|description=[[Purple Hatch]] | |||
|order=mid | |||
}} | |||
{{scan | |||
|data=There is a [[Blast Shield]] on the door blocking access. Analysis indicates that the Blast Shield is invulnerable to most weapons. [[Light Beam|Light energy]] may damage it.<ref>{{cite|There is a [[Blast Shield]] on the door blocking access. Analysis indicates that the Blast Shield is invulnerable to most weapons. [[Light Beam|Light energy]] may damage it.|Scan Data|[[Metroid Prime 2: Echoes]]}}</ref> | |||
|game=mp2 | |||
|location=[[Agon Wastes]] – Main Reactor | |||
|description=[[White Hatch]] | |||
|order=mid | |||
}} | |||
{{scan | |||
|data=Door system access denied.<br/>Unable to bypass security codes. Seek an alternate exit.<ref>{{cite|Door system access denied.<br/>Unable to bypass security codes. Seek an alternate exit.|Scan Data|[[Metroid Prime 2: Echoes]]}}</ref> | |||
|game=mp2 | |||
|location=[[Agon Wastes]] – Main Reactor | |||
|description=Locked [[Door]] | |||
|order=mid | |||
}} | |||
{{scan | |||
|data= Security systems active. Unique energy required for door access. Energize door with [[Dark Beam|Dark Energy]] to open it.<ref>{{cite| Security systems active. Unique energy required for door access. Energize door with [[Dark Beam|Dark Energy]] to open it.|Scan Data|[[Metroid Prime 2: Echoes]]}}</ref> | |||
|game=mp2 | |||
|location=[[Agon Wastes]] – Main Reactor | |||
|description=Gate | |||
|order=mid | |||
}} | |||
{{scan | |||
|data= Elevator platform active.<ref>{{cite| Elevator platform active.|Scan Data|[[Metroid Prime 2: Echoes]]}}</ref> | |||
|game=mp2 | |||
|location=[[Agon Wastes]] – Main Reactor | |||
|description=Hologram | |||
|order=mid | |||
}} | |||
{{scan | |||
|data=Magnetic rail system track detected.<br/>Real system powered and active. [[Spider Ball]] technology required to access track.<ref>{{cite|Magnetic rail system track detected. Real system powered and active. [[Spider Ball]] technology required to access track.|Scan Data|[[Metroid Prime 2: Echoes]]}}</ref> | |||
|game=mp2 | |||
|location=[[Agon Wastes]] – Main Reactor | |||
|description=[[Spider Ball Track]] | |||
|order=mid | |||
}} | |||
{{scan | |||
|data=Missile Expansion<br/>Increases the number of Missiles you can carry by 5.<ref>{{cite|Missile Expansion Increases the number of Missiles you can carry by 5.|Scan Data|[[Metroid Prime 2: Echoes]]}}</ref> | |||
|game=mp2 | |||
|location=[[Agon Wastes]] – Main Reactor | |||
|description=[[Missile Expansion]] | |||
|order=bottom | |||
}} | |||
====[[Metroid Prime Trilogy]] Only==== | |||
{{scan | |||
|data=Structural analysis complete.<br/>This is a standard Kellium energy reactor, converted by the Space Pirates to process Phazon energy. Building levels at 220% and holding.<ref>{{cite|Structural analysis complete. This is a standard Kellium energy reactor, converted by the Space Pirates to process Phazon energy. Building levels at 220% and holding.|Scan Data|[[Metroid Prime 2: Echoes]]}}</ref> | |||
|game=mp2 | |||
|location=[[Agon Wastes]] – Main Reactor | |||
|description=Kellium Energy Reactor | |||
}} | |||
===Inhabitants=== | |||
{{Inhabitants-header}} | {{Inhabitants-header}} | ||
{{Inhabitants|[[Dark Samus]]|1|First visit|close}} | {{Inhabitants|[[Dark Samus]]|1|First visit|close}} | ||
==Gallery== | |||
<gallery> | |||
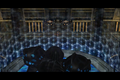
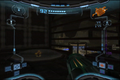
File:Main Reactor Samus.png|Samus in the lower area | |||
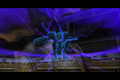
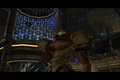
File:Main Reactor Dark Samus Phazon.png|Dark Samus absorbing Phazon | |||
File:Main Reactor Dark Samus notices Samus.png|Dark Samus interrupted by noticing Samus | |||
File:Main Reactor Samus and Dark Samus.png|Samus and Dark Samus facing off | |||
File:Main Reactor Samus and Dark Samus Faceoff.png|Samus and Dark Samus facing off | |||
File:Main Reactor Dark Samus Powers Up.png|Dark Samus powering up before her fight with Samus | |||
File:Main Reactor Dark Samus Powers Up Midbattle.png|Dark Samus powering up during her fight with Samus | |||
File:Main Reactor Dark Samus Dying.png|Dark Samus dying after the battle | |||
File:Main Reactor Dark Samus Dying 2.png|Dark Samus dying after the battle | |||
File:Main Reactor Dark Samus Dying 3.png|Dark Samus dying after the battle | |||
File:Main Reactor Dark Samus Exploding 1.png|The room exploding after Dark Samus's defeat | |||
File:Main Reactor Dark Samus Exploding 2.png|The room exploding after Dark Samus's defeat | |||
File:Main Reactor Room Exploding.png|The room exploding after Dark Samus's defeat | |||
File:Main Reactor Dark Samus Exploding 4.png|The room exploding after Dark Samus's defeat | |||
File:Main Reactor Dark Samus Dissolving 1.png|Dark Samus dissolving after her defeat | |||
File:Main Reactor Dark Samus Dissolving 2.png|Dark Samus dissolving after her defeat | |||
File:Main Reactor Dark Samus Dissolving 3.png|Dark Samus dissolving after her defeat | |||
File:Main Reactor Dark Samus Dissolving 4.png|Samus witnessing Dark Samus's defeat | |||
File:Main Reactor Samus Bouncing.png|Samus using the Boost Ball to bounce between Spider Ball Tracks to get the Missile Expansion | |||
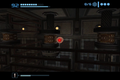
File:Missile Expansion - Main Reactor.png|The Missile Expansion | |||
</gallery> | |||
{{MP2 Rooms-nav|Agon}} | {{MP2 Rooms-nav|Agon}} | ||
[[Category:Rooms in Agon Wastes]] | [[Category:Rooms in Agon Wastes]] | ||
Latest revision as of 11:18, 17 April 2020
| ||||||||||||
| ||||||||||||

The Main Reactor is a room in the Agon Wastes. The room connects the Sand Processing, Storage D, Ventilation Area A, by a White Hatch, and Security Station B, by a Purple Hatch.
[edit | edit source]
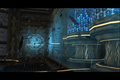
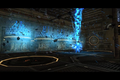
The room consists of a central room, surrounded by an upper walkway. The center room is taken up by a large number of tanks that contain large amounts of Phazon. The largest of these tanks is located in the center of the room. There are a series of tanks on one side of the room that can be navigated through using Spider Ball Tracks and the Boost Ball. Each tank has moving parts that will block the way, along with damaging Phazon on the bottom. If Samus falls to the bottom, she can leave each tank using a small hole leading back to the main room. If Samus successfully navigates the tanks, she will acquire a Missile Expansion at the end.
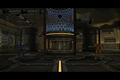
The upper walkway has two sections. The main section has doors to the Sand Processing, Storage D, and Security Station B. The latter door is separated by a gate that can be lowered by hitting a white crystal with the Dark Beam. There is an elevator connecting the levels near Storage D. There is also a large opening near the door to the Sand Processing, next to a dark purple area that is the destination of a Portal in the Dark Oasis. The Door to Ventilation Area A is located in a separate section, that can only be accessed from below using a Spider Ball Track. This section has the corpse and final testament of B-Stl. When Samus first enters the room, she sees Dark Samus absorbing energy from the central tank. Upon entering the central area, a battle between the two "Hunters" will start. When Dark Samus has been destroyed, the elevator will be activated.
Upgrades[edit | edit source]
Missile Expansion[edit | edit source]
Requires: Spider Ball and Boost Ball
- Once Samus has obtained the Spider Ball, she can enter a ledge above the Phazon containers in the northern part of the room. By using the Boost Ball, she can bounce between various platforms to reach the opposite side of the ledge, where the expansion can be found under a hatch in the ground that be destroyed using a Morph Ball Bomb.
Data[edit | edit source]
Available Logbook Entries[edit | edit source]


.png)
*Denotes limited scan
Scans[edit | edit source]
Metroid Prime Trilogy Only[edit | edit source]
Inhabitants[edit | edit source]
Gallery[edit | edit source]
-

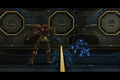
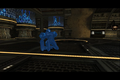
Samus in the lower area
-
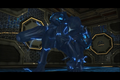
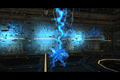
Dark Samus absorbing Phazon
-
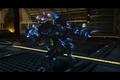
Dark Samus interrupted by noticing Samus
-

Samus and Dark Samus facing off
-
Samus and Dark Samus facing off
-

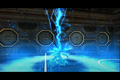
Dark Samus powering up before her fight with Samus
-
Dark Samus powering up during her fight with Samus
-
Dark Samus dying after the battle
-
Dark Samus dying after the battle
-
Dark Samus dying after the battle
-
The room exploding after Dark Samus's defeat
-
The room exploding after Dark Samus's defeat
-
The room exploding after Dark Samus's defeat
-
The room exploding after Dark Samus's defeat
-
Dark Samus dissolving after her defeat
-

Dark Samus dissolving after her defeat
-
Dark Samus dissolving after her defeat
-
Samus witnessing Dark Samus's defeat
-
Samus using the Boost Ball to bounce between Spider Ball Tracks to get the Missile Expansion
-
The Missile Expansion


Agon Transport Access · Collapsed Tunnel · Command Chamber · Communication Area · Dynamo Chamber · Fortress Transport Access · GFMC Compound · Grand Windchamber · Hall of Eyes · Hall of Honored Dead · Hive Access Tunnel · Hive Chamber A · Hive Chamber B · Hive Chamber C · Hive Save Station · Hive Storage · Hive Transport Area · Hive Tunnel · Industrial Site · Landing Site · Meeting Grounds · Path of Eyes · Path of Honor · Sacred Bridge · Sacred Path · Service Access · Storage Cavern A · Storage Cavern B · Temple Assembly Site · Temple Transport A · Temple Transport B · Temple Transport C · Torvus Transport Access · Transport to Agon Wastes · Transport to Sanctuary Fortress · Transport to Torvus Bog · Trooper Security Station · Windchamber Gateway · Windchamber Tunnel
Agon Energy Controller · Agon Map Station · Agon Temple · Bioenergy Production · Biostorage Access · Biostorage Station · Central Mining Station · Central Station Access · Command Center · Command Center Access · Controller Access · Main Reactor · Mine Shaft · Mining Plaza · Mining Station A · Mining Station Access · Mining Station B · Plaza Access · Portal Access A · Portal Terminal · Sandcanyon · Sand Cache · Sand Processing · Save Station A · Save Station B · Security Station A · Security Station B · Storage A · Storage B · Storage C · Storage D· Temple Access · Transit Station · Transport Center · Transport to Sanctuary Fortress · Transport to Temple Grounds · Transport to Torvus Bog · Ventilation Area A · Ventilation Area B
Upper Level
Abandoned Worksite · Controller Access · Forgotten Bridge · Great Bridge · Grove Access · Meditation Vista · Path of Roots · Plaza Access · Portal Chamber · Ruined Alcove · Save Station A · Temple Access · Temple Transport Access · Torvus Energy Controller · Torvus Grove · Torvus Lagoon · Torvus Map Station · Torvus Plaza · Torvus Temple · Transport to Agon Wastes · Transport to Temple Grounds · Underground Transport · Underground Tunnel
Subterranean Level
Catacombs · Catacombs Access · Fortress Transport Access · Gathering Access · Gathering Hall · Hydrochamber Storage · Hydrodynamo Shaft · Hydrodynamo Station · Main Hydrochamber · Save Station B · Training Access · Training Chamber · Transit Tunnel East · Transit Tunnel South · Transit Tunnel West · Transport to Sanctuary Fortress
Aerie · Aerie Transport Station · Agon Transport Access · Checkpoint Station · Central Area Transport East · Central Area Transport West · Controller Access · Dynamo Access · Dynamo Storage · Dynamo Works · Grand Abyss · Hall of Combat Mastery · Main Gyro Chamber · Main Research · Minigyro Chamber · Power Junction · Reactor Access · Reactor Core · Sanctuary Energy Controller · Sanctuary Entrance · Sanctuary Map Station · Sanctuary Temple · Save Station A · Save Station B · Sentinel's Path · Temple Access · Temple Transport Access · Torvus Transport Access · Transport to Agon Wastes · Transport to Temple Grounds · Transport to Torvus Bog · Transit Station · Vault · Watch Station · Watch Station Access · Workers Path
Controller Transport · Main Energy Controller · Temple Sanctuary · Temple Transport A · Temple Transport B · Temple Transport C · Transport A Access · Transport B Access · Transport C Access
Abandoned Base · Accursed Lake · Base Access · Defiled Shrine · Gateway Access · Ing Reliquary · Ing Windchamber · Lake Access · Phazon Grounds · Phazon Pit · Plain of Dark Worship · Profane Path · Reliquary Grounds · Reliquary Access · Shrine Access · Sky Temple Gateway · War Ritual Grounds
Battleground · Bitter Well · Crossroads · Dark Agon Energy Controller · Dark Agon Temple · Dark Agon Temple Access · Dark Controller Access · Dark Oasis · Dark Transit Station · Doomed Entry · Double Path · Duelling Range · Feeding Pit · Feeding Pit Access · Hall of Stairs · Ing Cache 1 · Ing Cache 2 · Ing Cache 3 · Ing Cache 4 · Judgment Pit · Junction Site · Oasis Access · Phazon Site · Portal Access · Portal Site · Save Station 1 · Save Station 2 · Save Station 3 · Trial Grounds · Trial Tunnel · Warrior's Walk · Watering Hole
Upper Level
Ammo Station · Brooding Ground · Cache A · Cache B · Dark Arena Tunnel · Dark Controller Access · Dark Falls · Dark Forgotten Bridge · Dark Torvus Arena · Dark Torvus Energy Controller · Dark Torvus Temple · Dark Torvus Temple Access · Gloom Vista · Poisoned Bog · Polluted Mire · Portal Chamber · Putrid Alcove · Save Station 1 · Venomous Pond
Subterranean Level
Crypt · Crypt Tunnel · Dungeon · Sacrificial Chamber · Sacrificial Chamber Tunnel · Save Station 2 · Undertemple · Undertemple Access · Undertemple Shaft · Undertransit One · Undertransit Two
Aerial Training Site · Central Hive East Transport · Central Hive West Transport · Culling Chamber · Entrance Defense Hall · Hazing Cliff · Hive Ammo Station · Hive Cache 1 · Hive Cache 2 · Hive Controller Access · Hive Dynamo Access · Hive Dynamo Works · Hive Energy Controller · Hive Entrance · Hive Gyro Access · Hive Gyro Chamber · Hive Portal Chamber · Hive Reactor · Hive Reactor Access · Hive Save Station 1 · Hive Save Station 2 · Hive Summit · Hive Temple · Hive Temple Access · Judgment Drop · Staging Area · Temple Security Access · Unseen Way · Vault Attack Portal
- ↑ "This is a powered door system. Low-level energy shield on door to prevent activation by local creatures. Weapon fire of any type will disrupt the shield and open the door." —Scan Data (Metroid Prime 2: Echoes)
- ↑ "There is a Blast Shield on the door blocking access. Analysis indicates that the Blast Shield is invulnerable to most weapons. Dark energy may damage it." —Scan Data (Metroid Prime 2: Echoes)
- ↑ "There is a Blast Shield on the door blocking access. Analysis indicates that the Blast Shield is invulnerable to most weapons. Light energy may damage it." —Scan Data (Metroid Prime 2: Echoes)
- ↑ "Door system access denied.
Unable to bypass security codes. Seek an alternate exit." —Scan Data (Metroid Prime 2: Echoes) - ↑ " Security systems active. Unique energy required for door access. Energize door with Dark Energy to open it." —Scan Data (Metroid Prime 2: Echoes)
- ↑ " Elevator platform active." —Scan Data (Metroid Prime 2: Echoes)
- ↑ "Magnetic rail system track detected. Real system powered and active. Spider Ball technology required to access track." —Scan Data (Metroid Prime 2: Echoes)
- ↑ "Missile Expansion Increases the number of Missiles you can carry by 5." —Scan Data (Metroid Prime 2: Echoes)
- ↑ "Structural analysis complete. This is a standard Kellium energy reactor, converted by the Space Pirates to process Phazon energy. Building levels at 220% and holding." —Scan Data (Metroid Prime 2: Echoes)